Saturday, 14 November 2015

Word Family Fun!


Word families can be a tricky concept for our little learners, yet they are SO IMPORTANT to play with and learn for blending and segmenting. I have put together here a few quick and simple activities which can be done at a whole class level. For just about any of these activities the only resources you will need are student sized whiteboards and markers, large letter cards, large bowls or hula hoops (failing that, chalked out circles), beanbags, cups/bowls, a pocket chart and some CVC picture cards for whatever your focus is. As always, these activities do not involve worksheets and are 100% hands on for higher engagement levels. I have linked in a couple of freebies you can snag up to use with these activities too so keep an eye out!

Bucket Toss


This type of game is so versatile that I have included pictures of 4 different ways to play (but if you experiment I am sure you will be able to find more). These buckets I purchased for $2.50 for 2 from my local Overflow store :)

Game #1 - Label buckets or hoops with word families (eg -at, -eg, un etc.). Show the students a picture, have them say the word and identify the word family, then toss a beanbag in the matching bucket.

Game #2 - Direct inverse of Game #1 - Give students a word family and have them toss the beanbag in the bucket of a word in that family.

Game #3 - Label the buckets with a range of pictures in your focus word family (or multiple for reviewing). Write a word on a whiteboard and have the students read the word and toss the beanbag at the matching picture.

Game #4 - Again, the direct inverse of Game #3 - Label the buckets with CVC words, show a picture and have the kids find the matching word.

Building Word Familes


Very simple activity to set up and great for blending practise. Just choose your focus word family and write the family on 2 cups, and label other cups with a range of consonants to blend. As you add another cup to the beginning, work together to blend the letter sounds together and read the new word. This activity could easily be done on a larger scale using a pocket chart and letter cards.

Hop it Out


Again, this is great blending and segmenting practise.

In the top picture, show the students a picture card and use the teddy to hop out the sounds they hear. After the sounds are identified, go back through and identify the letters to spell the word.

In the second picture, show the word using large letters and 3 pictures (one correct). Have the students hop out the letter sounds and blend them together to identify the matching picture.

Again, this set-up is great for a small group setting, but you could easily adapt it for whole class activities by using hoops (or chalked out circles) and have the students use their bodies to hop out the sounds. Again, you could have the students themselves hop up and hold up large letter cards to spell the words.

I LOVE these cards! If you would like to grab your own set, you can snatch them up for FREE from Rulin' the Roost HERE.

Roll a Word 


More blending practise, playing around with real and nonsense words. Chose your short vowel and place a large letter on the carpet. Fill a pocket dice with a variety of letters (consider what are common letters for the ending and beginning of words with your short vowel). I found it helpful to make the dice different colours to make it easy to see which comes first and which comes last. Roll the dice, read the word and decide whether the word is real or nonsense. You can choose to record these on a whiteboard or to just make it a verbal activity. 

Where's my Bone?


Simple as, just hide a small object or picture under cups or bowls labelled with words from your focus word family and have the students guess where the object is hidden. I chose to use a dog and a bone. Again, this is an easy one to do in a pocket chart just with cards and a small picture.

Word Family Fishing


Again this is a very versatile game and I have put together 5 different versions to share with you. Play around with it and you will find more ways to play :) All you need are some fish (print or draw, laminate and attach a paper clip to them), and a couple of $2 store magnetic fishing rods. Add some paper labels for anything you need (sorting, words etc) as you play different games.

#1 - Students fish out pictures of CVC words (blue tack to the back of laminated fish) and have the students use the large letter cards to make the word.

#2 - Play the same as game #1 but replace the letter cards with whiteboards and markers.

#3 - Choose a work family and write a variety of different CVC words (both real and nonsense) on the back of the fish (or use sticky-notes, or blu-tack words to them). Have the children read the fish they catch and decide whether it is real or not. The sorting mats I have used here are just written on pieces of paper.

#4 - Choose a few CVC word pictures, either from one word family or from a range of word families and write the matching words on the back of fish. As the kiddies pull of a fish, they should read the word and find the matching fish.

#5 -   Add a selection of CVC pictures to the backs of the fish and place in the bucket. Choose a word family to sort and as the kiddies pull out a fish, have them decide whether it matches the wprd family or not. Again, I have just written the word family labels on paper. This coul easily be swapped ut for small whiteboards.

Word Family Hop


I have found this probably the easiest game ever. I tend to forget about using the cards and just write different word families on the carpet in chalk. Just choose your word families, create a spot for them and either show the kiddies a picture or tell a word and have them hop on the matching word family. I usually play 2 at a time and the kids just love it!

Word Family Houses


I love this activity and these houses make the cutest anchor charts and displays. The houses are just cut out of large size cardboard and pictures cut out of paper. I would have the pictures cut out and ask the students to brainstorm different words from the same word family. As they say a word I just add it to the chart. I have also done this 2 houses at a time where I ask the kiddies which word family house each word belongs in. This was great for kids to visualise the grouping and relation different words. 

Musical Words


This is such a cute little game I found on Pinterest from Miss Giraffe! I just love it! Kiddies sit in a circle, wander around when the music plays and they read the word they are at when the music stops. I can just see my little treasures having a blast with this one :) you can check it out along with a ton of fun word family word work stations HERE

You can also download a free set of word family pictures from designed by teachers HERE, or from teachers pay teachers HERE to use with these activities.

I hope this has given you some ideas. If you have any of your own activities which have helped your little ones 'click' I would love for you to share :) 

Til next time :)


Tuesday, 10 November 2015

Classroom Tour 2015


I found some photos on my both my phone and iPad of my classroom and thought I would share these with you all :) I do not have photos of everything, and some photos might be a bit dodgy, but this will give you a basic idea of just how my room is set up :)

Teaching Spaces


I really only have 2 teaching spaces in my room - the carpet and desks. We pretty much use the carpet for most everything in Prep. I am lucky to have 2 small whiteboards in my teaching space. One I purchased myself last year, and the other was provided by the school. The smaller board I now use mainly for anchor charts and pocket chart activities. I display our focus text on chart paper there and we refer to it throughout the term. The trolley there houses all my own teaching materials - letter and sound cards, pointers, paper, small teaching charts and posters, beanbags etc. Markers are stored in the whiteboard drawer, and texts are stored under the whiteboard.

Focus Wall


This is our focus wall where I display whatever we are learning at one time. It houses our calendar, daily schedule and our letters or sounds and sight words of the week. I also have the focus text displayed along with focus vocabulary words from the text and our maths focus. The number posters are from Term 1 when we were learning all about ways to show different numbers. The boats are part of our long vowel spelling pattern sorts from Term 2, and the text displayed is our focus letter from this term.

Phonics Displays


These posters are my absolute FAVOURITE things in my classroom. They took me months to create and I am so happy to finally have them on display! Each letter shows sound picture and action from our school phonics program, while the tricky vowel sound show the different spelling patterns for each. Like I said - they took forever to make, but I LOVE THEM!

Learning Displays


These are our 3 learning displays in my room. The first is a personal learning goal chart. A few year ago our school adopted this part of ASOT and now each classroom as its own display. The students are given a goal each and we track how they are travelling throughout the term. When they have achieved their goal, each child receives a badge to wear for the week, visits the office to show off their achievement, and receive an award on parade. This has been great for the school community :)

Next is our reading tree. Every Prep classroom has one. Each day a child brings back their reading folder, they fill in a leaf with their name and book title and it is added to the tree. This has been amazing to see grow throughout the year.

Lastly, this is my writing goal display. Each child has a goal to work on which we revisit before writing each day. This is relatively new to my room but my students love them and are keen to work on their own goal.

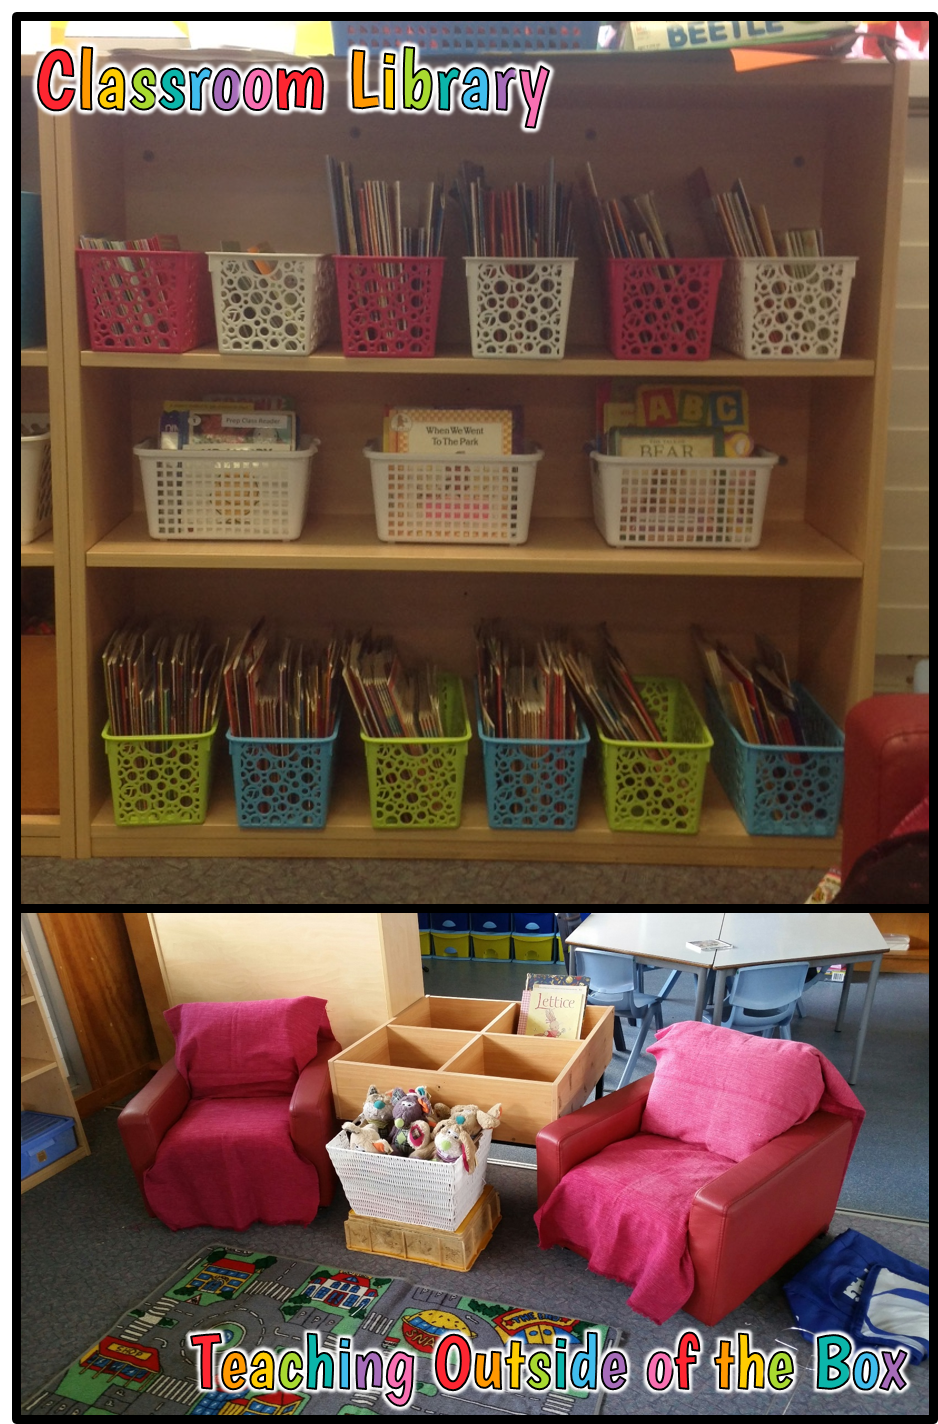
Classroom Library


Yes, I have a thing for coloured baskets... No it is not a problem - I totally have a handle on it!

In that white basket live our cute reading buddies. Each time the kids go to the carpet to read, they can choose a reading buddy to read to :) Next year I am hoping to be able to add in some whisper phones to that basket too.

Classroom Resources


Onto our classroom resources...

On the left you can see my game and resource shelf. On the top shelf are board games, Mr. Potato Head, and other games for my kids during free play (or Social-Skill time). Below that are whole group math-manipulatives. This is the home of 3D shapes, attribute blocks, unifix-cubes and the likes. This shelf is right beside my whiteboard and makes it very easy to pull out what I need during maths lessons. Below this are dice, cards and other small game items, and on the bottom shelf are dominoes, puzzles, and my bowling pins (which are pulled out for maths occasionally).

Next over is my Literacy Resources storage area. On the left are the shelves where my word work options are stored (letter tiles, Wiki Stix, sand trays, play dough letters and the likes. Next to that are my whiteboards and markers, Kinetic Sand, large sand trays, magnet letters and a basket of small literacy games.

Finally, this is my craft trolley. I know it looks very drab. If I am in Prep next year and have the same room, it will be given a paint make over (I may need to recruit my darling husband to help me out!)

Group Activities


In my room, I have 5 different sets of group baskets - This might seem alot, but it has been great for organisation, and to allow my kiddies to work to the best of their ability.

First, the green baskets house my literacy rotation activities. I have one basket each for writing, handwriting, technology (tablets), sight words, spelling, and letter recognition. Below these are my math rotation baskets (the yellow set). In the baskets are activities for counting, number recognition and formation, number knowledge, visual discrimination, fine motor activities and technology (tablets again).

Both my literacy and math rotations are new this term but my kids love them and they have worked brilliantly. These currently get swapped out weekly.

Below them are my Guided Math baskets. Twice a week I have extra helpers in my room when I run my guided math. These baskets hold a variety of manipulatives and various activities to build number sense. (I will be writing up a post all about some games and activities I like to use with my groups at some point). This guided math time is completely hands on and the students play with numbers.

On the bottom shelf I have a set of coloured magazine holders. One holds our writing books, one has rotation activities, another extra math and literacy activities. This helps me to keep all the materials together and helps my keep organised :)

Next over I have my Guided Reading set up. Again, I am very luck to have helper 4 times a week which enables me to run 5 groups for 30 minutes every day. This has been wonderful and now my kids actually get upset if they miss their reading time! In each box are readers, magic wand we use to track with, fluency sentence strips, whiteboards and markers, counters, bingo and various fun phonics and sight word games.

In the buckets below these are my extra guided reading activities.

The last basket there is full of math manipulatives and is used during whole class activities. When we are all at our tables and working on number sense, these baskets come out. I have made up 5 different baskets, one for each table.

Student Resources


This year I trialed placing student resources together and making my students responsible for them and it has worked brilliantly!

Each set of drawers holds books and materials for one group. The trays hold materials students will need each day (worksheets, craft supplies, sentence strips etc.). The basket themselves hold trays of scissors, crayons, pencils, glue sicks and lead pencils. Having everything in separate baskets means that when the kiddies are colouring, or completing a worksheet, they will only have what they need. The scissors will only come out as needed, as will the glue. This has also been good for students to develop responsibility for themselves, and takes away a little bit of prep work from me. When students are about to start an activity, I can send them to their tables and ask one or two students to grab their trays and whatever supplies they will need.

Anyway, that is my classroom. I hope I may have given you a few ideas :) I will make sure to do a detailed post in January of my new room!

Thanks for stopping by!

Hands On Addition


Welcome back all! Today I thought I would share a few ideas for exploring addition in a hands on way. I have played various versions of each of these activities with my students, both in Grade 1 and Prep, and they have all enjoyed them. I have tried to choose games which can be very easily manipulated, and which require very little prep work from you. All of these can be played at both a whole class and a small group level, depending on what your focus is.

Apple Addition


If this game looks familiar, it probably does! This activity is just a tweaked version of my Apple Tree counting game which I shared in my first post about 'Number Sense Warm Ups'.

There are 2 ways to play this game, both requiring the same set-up. All you need are 2 Cardboard cut-out trees, paper plate numbers to 10 (or beyond), whiteboards and markers, and scrunched up red and green paper for the apples. Have the students help you place the number plates in order to form a numberline, and scatter the apples around the trees.

Game #1: Scatter both red and green apples between the trees. If you are focusing on count-ons, try putting out only 4 or 5 red and 10 or more green. In most cases, this will help the students collect count-on facts to solve. Invite 2 students to collect as many apples as possible and place them on their trees. After the students have filled their trees, they will count up the number of each colour and write the addition on a whiteboard. This is a good opportunity to discuss how to write the larger number first. The students solve their additions and stand by their number. The class can then compare who has the greatest number of apples.


Game # 2: Scatter only one color of apples between the trees. Again invite the students to collect as many as they can to fill their trees. Collaboratively write the addition sum on a whiteboard and solve together as a class.

Fishing Addition


Again, this game is a twist on a fishing game I have already shared in my 'Number Sense Warm Up' post. Set up 2 'ponds' using hula hoops and fill with magnetic fish - I just added paperclips to some cardboard ones. Invite 2 students up to go fishing. To make this even more fun I chose 2 of our class teddies who the students would be helping out. Give the students 30 seconds to pick up as many fish as they can with their rods (time to practise counting to/from 30!). Once you reach 30 (or 0), count up each collection, write the sum, and solve to see how many fish the kids caught!

Modelling Count Ons


When working with count on facts, I try to only have the 'count on' part in materials to encourage the students to actually 'count on' not 'count all'. For this game, you will need some sort of moveable numberline. In the photo I have used cups with sticky notes but you could also use tent-folded cardboard numbers - I find it best if the numbers are standing up to make them easier to see. Place a paper plate number down next to an empty plate. Count out a number of counters onto the empty plate. Use the numberline numbers to model the addition sum shown. I chose to add in cups showing the addition and equals signs to help make the number sentence clear.

Paper Bag Count Ons


Again, for this activity I like to have a moveable numberline to show how we can use a numberline to solve additions. Place a number on a sticky note on an empty bag and scatter 1, 2 or 3 objects in front of it. I suggest using 2 counters. With one counter, make the number you are counting on from (the number shown on the bag). With the other, show the jumps you will make to 'count on' to get the solution.

Rainbow Facts


This game is very easy to set up and play - all you need are 2 plates, a moveable numberline, and 10 of something. This size is perfect for small group work, but if you are looking at it as a whole class, I would be replacing the plates with hula hoops, the cups with paper plates, and the counters with bean bags or something else relatively large. To play, just choose a number for the first group, count out that number of counters, and place the rest in the second group. As you work, This would be a great opportunity to record the students discoveries to create an anchor chart.

Roll and Count On


Again, very easy to set up and play. See that die? Guess what it is... a Rubiks Cube! I kid you not! I have just Blu Tacked a set of pictures of collections of 1, 2 and 3 apples to each side. This would work perfectly in a pocket die. No need for fancy pictures either - just add some dot cards :)

Pick a number to start with and have a student locate it on the numberline and mark it with a counter. Have a student roll the picture die, and model the count on with another marker (I used plastic jets - great to keep the boys engaged!)

Roll 'n' Add


Yep! That's the same Rubik's Cube picture die there! Just add a large regular die (or again add numbers to a pocket die and you have a game ready to go. Have a student roll each die and state and solve the resulting count on fact. Because of it's very quick play, this is a great game to play as a warm-up to build fluency with count on additions.

Target Practise


Remember those paper plate numbers? Scatter them in a group, add a beanbag, a tens frane and some markers (chalk and sports markers works great!) and you have a Rainbow Fact addition game ready to play. Invite a student to toss the beanbag onto a paper plate and show that number in the tens frame. Have the class identify how many more you need to make ten. Fill the tens frame with markers of another colour and record the rainbow fact.

Teddy Addition


I am all about making math fun, and what better way to do that than by adding teddies? When I taught Grade 1, in Term 4 I made every Friday 'Teddy Math' day. This was our FAVOURITE time! One of our Teddy Math games was to simply show and solve additions like you see here. You could easily alter this to focus on count ons by placing a bucket or a box upside down and have a number of teddies 'hiding' in a cave. Heaps of fun - your kids will love it, I guarantee it!

Toss 'n' Roll


This is another fun count on fact game. Take out those paper plate numbers again, the picture die, and a beanbag (or one of those scrunched-up apples you now have) and set them up as shown here. Invite a student to toss the beanbag onto a plate, then roll the die and solve the addition fact you have made.

Remember, all of these games can be very easily tweaked to suit whatever your focus may be. Maths is my favourite time of day because we play so many games and the kids are so engaged. I hope this has given you a few ideas to play with too.


Friday, 6 November 2015

Five For Friday - 6 November, 2015


2 weeks ago, I managed to trip over one of my treasures while she was off in space and SOMEHOW managed to break my thumb! ...anyway, long story short - GP sent me to the hospital, hospital referred to the fracture clinic, fracture clinic referred to private hospital for surgery. So I am now sitting at home for 2 weeks wondering what my little kiddies might be doing right now, how they are going in their writing, whether they miss me... So I am now styling a cast and going crazy!


So being stuck at home, I have been reflecting on my teaching practises (starting with maths), and I finally got this blog started! Yesterday I made my first post all about number sense warm ups and I have been overwhelmed at the response from it! I am very excited to keep sharing ideas here :) If you would like to check it out, you can click on the link below.


Another way I have been keeping busy... Recording down all the number warm ups we have played this year, and thinking up new versions we could play :) I am all about making learning fun!


This week I splurged and purchased this awesome growing bundle from my favourite tpt seller, Tara West. I spent yesterday reading, re-reading, and reading again the first 2 units on Numbers to 5, and Sorting and Classifying. These are jam packed with ideas and I am Soooooo happy I put the money in mow to purchase them. They will be a huge help when it comes to planning for 2015. If you are interested in reading more about it, I have provided a link to the product. It is an expensive outlay at first, but I believe I have already got my money's worth, just in the first few units!


These are a few photos from my guided math group last Thursday (I know it is a bit outside the timeline but I really wanted to share!)

This little group of kids have been working ridiculously hard all year, and they have made leaps and bounds in their reading and letter sounds. We are finally cementing numbers to 10 (from starting with nothing!) and they are having a great time doing it.

In this lesson, we played with our teddy bears, compared collections, counted collections working on 1 to 1 correspondence, and drew our own collections. This is what I love about being a teacher :)


Until next time :)


Thursday, 5 November 2015

Number Sense Warm Ups

Ever since I started teaching, my Number Sense Warm Up has been my absolute FAVOURITE time of day! This year, after moving to Prep, I have spent a HUGE amount of my spare time thinking up new ways to teach number sense through games (thank you Pinterest!)

Here is a little look at some of my favourite...


All About...


Another version of 'Number of the Day' type activities. I loved creating these with my students at the very beginning of the year. This was a great opportunity to build key mathematical vocab right from the word go like tally marks, tens frames, counting fingers, numerals and collections. Initially we completed this activity as a brainstorm on the blackboard every morning during Circle Time, and I later transferred the work to a number poster.

These numbers sat on display in our Daily Focus board for a few weeks, after which we hung them up across the room and used them as a reference point for our counting and numberline activities. They have also come in handy this term when we have been talking about different ways to show numbers to 20.

Apple Picking


This comparing numbers game has evolved over time and it has to be our favourite warm up of all time! Initially, the students simply raced to collect as many apples (scrunched up red paper) as they could and placed them on their apple tree (cardboard cut out). They then counted their apples and wrote the matching numerals on their boards. As they held up their boards, we compared who had more or less and talked about how we knew.

In another version, I swapped out the whiteboards for a paper plate numberline. Before beginning the Apple Picking we placed the numbers in order and used mathematical language to decide where each number should be located. The game played the same, however once the students had counted their apples, they stood by their number on the numberline. This change made the more or less discussion much easier for the visual learners in my class.

Since then, we have added 'Clara the Cow' who loves to eat apples. After we decide who has more apples, Clara eats a few apples from the tree and we have to count-back on our numbeline to see how many are left. Fun introduction to early subtractions :)

We have played this game with penguins, fish and a pesky cat who loves stealing fish, and banana trees with greedy monkeys! Very easy to manipulate and the kids love it!

Fish 'n' Build


This game was really to help cement automaticity in recognising numbers and knowing what it would look like on a tens frame. 3 students at a time would fish for a cardboard fish with a number on back from their pond. Once they had pulled out their fish, they read the number and built it with sports markers in their tens frames. We of course used this opportunity to discuss the different ways a number can look in a tens frame, as well as who has more or less.

Missing Number


Easy as set-up, and a great opportunity to develop mathematical vocab with little ones. After I set up the numberline (folded over bits of heavy card), the kids hid their eyes and I placed an animal in front of a number. The goal of the game is to have the students identify the missing number AND explain how they know. For example, "The missing number is 2. I know because 2 comes after 1 and before 3."

Mystery Number


For this warm up, I use the same numberline as in 'Missing Number' and bring out 2 animals. I choose a number and place the animals on each end. As the students guess numbers, I answer with 'higher' or 'lower'. Each time, the students identify which animal needs to move and we state the new number range for the mystery number (ie. between 3 and 6).

Number Hop


This one is great for the beginning of the year. I used Zip-Lock bags and sticky taped them to a Twister mat for an interchangeable playing mat. I would simply call out a number and have a student 'hop' on it. We also play 2 at a time using fly swatters which is great for a larger class. I liked beginning with the different ways to show the numbers to allow those students unfamiliar with numerals at the beginning of the year a chance at success.

Number Match Up


Another easy self-explanatory game. If you would like to try this out, you can download a set of cards for FREE from HERE. I have played by placing the picture cards upside down and having students take turns to turn them over and place by the correct number (This would work well in a pocket chart).

Toss 'n' Build


This game plays very similar to 'Fish 'n' Build' above. The students have a beanbag each and toss them onto a paper plate with a number, then build them in the tens frame (points for integrating gross motor development!)

Where's the Fish?


This is a really simple game that can be used for just about any concept. Just make up cards for each different number (or shape, letter, sight word etc...) and print a small object to hide and a character to search (and make it more fun!) I chose to use a penguin and a fish as I already had these on hand, but some alternatives might be a dog and his bone, cat and mouse/fish, dinosaur and a plant/leaf etc.. Pretty much ANYTHING!

Who Has More?


This is one of the very first games I played with my Preps. All you need are 2 animals, some cards to count out (I used fish), a numberline and cards with 'more', 'less' and 'same' on them. I adapted this game from one found at Little Minds at Work by Tara West. I just chose to swap out picture cards for countable objects. She has a fabulous set of cards you can use to set up the same activity available fir FREE from HERE.

As you can see, I LOVE making fun, hands-on games for my kids and it has made a huge difference in their math skills. They don't even see it as work!

I hope I have given you a few ideas to try out - I would love to hear from you if you do!